My mother made this dessert at my wedding luncheon and everyone was blown away. We were serving cheese cakes and a chocolate cake later that day at the wedding reception, so my mom decided to pick something different for the luncheon. This dessert was so incredibly fabulous that I think I wanted to lick my plate clean. Please note that this recipe does take some preparation (refrigeration over night), but it is well worth the effort.
Torte
4 large eggs
3/4 cup plus 2 tablespoons sugar
1/2 cup fresh lime juice
1 tablespoon grated lime peel
1/2 cup dark rum
1 16-ounce frozen all-butter pound cake, thawed
2 8-ounce packages cream cheese, room temperature
Compote
1/2 cup water
1/2 cup sugar
1/2 cup fresh lime juice
1/2 teaspoon grated lime peel
4 large ripe mangoes (5 to 6 pounds), peeled, pitted, diced
lime slices
For Torte: Whisk eggs, 3/4 cup sugar, lime juice and lime peel in heavy medium saucepan to blend. Whisk over medium-high heat until mixture thickens and just comes to boil, about 6 minutes. Transfer lime curd to small bowl; press plastic wrap directly onto surface. Chill until very cold, at least 3 hours and up to 3 days.
Line 9 1/4x51/4x23/4-inch loaf pan with 2 layers of plastic wrap, leaving long overhang. Stir rum and remaining 2 tablespoons sugar in small bowl until sugar dissolves. Trim brown layer from outside of cake. Cut cake horizontally into 3 equal layers. Beat cream cheese in large bowl until fluffy; gently fold in cold lime curd.
Trim bottom cake layer to fit pan bottom; reserve cake trimmings. Brush layer on both sides with 1/3 of rum syrup. Place in pan; spread 1 1/2 cups lime curd mixture over top. Brush second cake layer on both sides with 1/3 of rum syrup. Place in pan; spread remaining lime curd mixture over top. Brush third cake layer on both sides with remaining rum syrup. Place on lime curd mixture; press to adhere. Press reserved cake trimmings around sides. Cover torte with plastic overhang. Refrigerate torte at least 1 and up to 2 days.
For Compote: Stir first 4 ingredients in large bowl until sugar dissolves. Mix in mangoes.
Cover; chill up to 1 day.
Using plastic as aid, lift torte out of pan and unwrap. Cut crosswise into 12 slices. Arrange slices on plates. Top with compote. Garnish with lime slices.
Monday, March 23, 2009
Wednesday, March 18, 2009
streusel kuchen
Last night I taught our monthly cooking class for Enrichment, and I decided to teach on making bread, since it is so easy to make, but yet a lot of people have never tried it. We made two batches of french bread and then two pans of Streusel Kuchen (German Crumb Cake). The recipe came from my great grandmother, and it is absolutely fantastic. You literally combine the ingredients and press it into a pan and bake.
The french bread was a huge hit! I also brought along my dipping spices, which always make bread better. After that, we talked while the Streusel Kuchen baked in the oven, and then I passed around pieces of the cake for everyone to try. We had about 30 women at the cooking class, so it was a great success.
Streusel Kuchen
3 T yeast
½ c warm water
1 c scalded milk
½ c butter
½ t lemon extract
2 eggs
½ c sugar
4-5 c flour1 t salt
Combine yeast and water and let grow. Melt butter in scalded milk. Add to yeast mixture along with the eggs, sugar, and extract. Add flour until dough is soft and still a little sticky. Press into pan and rise for 20-30 minutes. Combine sugar, flour, butter and sprinkle on top. Bake at 350 for 12-15 minutes. Glaze with ¼ c lemon juice and 2-3 c powdered sugar. Best if served warm.
Crumbles:
1 c flour
1 c sugar
½ c butter
Glaze:
¼ lemon juice
2-3 c powdered sugar
Tuesday, March 10, 2009
spring apron giveaway winner
Congratulations to Jill for being the lucky winner of the Spring Apron Giveaway! Jill will receive one custom made apron by your truly.
Jill, please email me at artnotascience@gmail.com the address you would like me to mail it to.
Jill, please email me at artnotascience@gmail.com the address you would like me to mail it to.
Wednesday, March 04, 2009
the BEST cupcakes in DC

As a baker myself, I'm usually skeptical of reports of great cakes or cupcakes. Often I have a slice of cake and think "my own carrot cake is better than this." If you are a food snob like myself (or love cupcakes), then you MUST try out Frosting, A Cupcakery.
My friend Michelle is one of the most talented bakers I have ever met and just opened her own cupcakery. Last weekend I had the pleasure of tasting her amazing cupcakes, and I was honestly blown away by the presentation and taste. The cupcakes were impeccably frosted and so delicious that I may or may not have eaten a few in one sitting. My favorite flavors were the Cookie MOMster (chocolate cupcake with almond and Oreo butter cream frosting) and Babas Baby (carrot cake with cream cheese frosting). The menu is HUGE and is full of so many delicious options.

My friend Emily also came over to taste test the cupcakes, and we both agreed these were by far the best cupcakes in DC. The shop is still not open yet, but you can order cupcakes to be delivered. If you love cupcakes, you must try these.
Tuesday, March 03, 2009
the best chocolate frosting i've ever had
I am not exaggerating that this is the best chocolate frosting that I have ever had. Thanks to Jenn Fox for introducing me to this frosting and providing her recipe. She even told me that it has been used to woo men. I'm so not surprised.
Chocolate Buttercream Frosting
3 ounces unsweetened chocolate, melted
2 ½ cups powdered sugar
1 ½ tablespoons unsweetened Dutch-process cocoa powder
1 ½ cups or 3 sticks unsalted butter, at room temperature
1 teaspoon vanilla extract
½ cup heavy whipping cream, at room temperature
Sift the powdered sugar and cocoa powder into a large bowl. Add the butter and using an electric mixer on low speed beat until smoothly blended, about 2 minutes. Add the unsweetened melted chocolate, vanilla and heavy cream, mixing to incorporate. On medium speed, beat the frosting for at least 3 minutes, until it looks smooth and creamy and the color lightens. Once the cupcakes are frosted they can be left for up to three days at room temperature or stored in the refrigerator. Makes enough frosting for one box cake or cupcakes.
Monday, March 02, 2009
arts and crafts part 2
Just thought I'd post pictures of the continuation of arts and crafts day. After lunch with my husband, I went back to sewing another dress and then an apron. It has been a really fun day using up old scraps of fabric and seeing what kind of fun things I can make. It may be snowing outside, but it definitely feels like spring.
 The fabric is white with green concentric circles. I loved the contrast of the orange fabric for the pocket.
 Here is a close-up of the orange bow that ties the two sides of the dress together. You can see the pattern of the green fabric here.
 I've had this fantastic blue fabric with tiny white bows for awhile, so I finally decided to use the last bit to make an apron.
 Here is a close-up of the cherry fabric and the blue bow fabric. Both were scraps from other projects, so I was happy to use them up.
snow day: arts and crafts
 I woke up this morning at 5:45 am to the sound of my cell phone ringing. I would have been more mad, but it was just work calling saying that the office was opening two hours late. I peeped through the blinds to see a few inches of snow, jumped back in bed, and dreamed of a snow day (I'm not joking, I really did dream I had a snow day).
Ben and I woke up at the normal time and enjoyed a very leisurely morning. As I was getting ready to bundle up and head out into the snow, I got another call from work saying they have decided to close the whole day! I may or may not have done a little dance and giggled. Ben put on his snow boots and headed out the door to walk to work in this year's first winter wonderland. He also snapped the picture of us "snowed in."
After updating the blog on this weekend's activities, I pulled out the sewing machine and surger to work on some projects. And 60 minutes later I would like to share my newest creation!

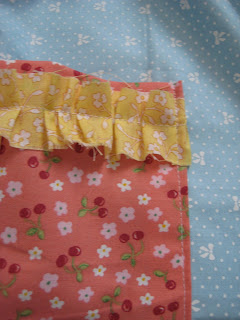
Behold, the girliest dress I have ever made. Not that I don't like it (I LOVE those ruffles).

A close up of the ruffles. I added them at the end kind of as an experiment. And I love them. I don't think every girl needs to wear ruffles all the time, but it sure does make this dress fun.
 A close up of the pocket with a ruffle. (Blogger sometimes likes to rotate my pictures without my telling it to. I'm not sure how to undo this, so here is a sideways pocket.)
american history museum
Ben and I love taking advantage of the free and incredible museums in DC, so this past Saturday we headed to the newly opened American History Museum (which was closed for a few years for renovations). A lot of the exhibits were the same as before (First Ladies Dresses, The Flag), but others were new.
I loved exhibit on transportation. It had really old buggies, a Ford Model T (in black, the only color it came in because black paint dried the fastest), a Roadster, and lots of other vintage cars. It was really amazing to see the changes in style over the years and also see old models that you only see in movies.
There was also a fabulous exhibit on America in war. It had great artifacts (Washington's dishes from when he was in battle) and really great displays. It reminded me a lot of the Holocaust Museum (it was also incredibly instructive), but not nearly as depressing.
The other fun part about this museum, is that it had random artifacts from American history and Pop Culture. Here is Ben with some of his favorites:

 Oscar the Grouch (who was originally created orange instead of green)
 C3PO. I have to admit this was pretty awesome.
 Ben and I also popped into the Natural History Museum to see an exhibit with a real Giant Squid. It was hard to take a picture of the squid in formaldehyde, so instead here is Ben with the jaws of a Megal0don (giant shark).
I loved exhibit on transportation. It had really old buggies, a Ford Model T (in black, the only color it came in because black paint dried the fastest), a Roadster, and lots of other vintage cars. It was really amazing to see the changes in style over the years and also see old models that you only see in movies.
There was also a fabulous exhibit on America in war. It had great artifacts (Washington's dishes from when he was in battle) and really great displays. It reminded me a lot of the Holocaust Museum (it was also incredibly instructive), but not nearly as depressing.
The other fun part about this museum, is that it had random artifacts from American history and Pop Culture. Here is Ben with some of his favorites:
Remnants from the original Star Spangled Banner
 Oscar the Grouch (who was originally created orange instead of green)C3PO. I have to admit this was pretty awesome. Ben and I also popped into the Natural History Museum to see an exhibit with a real Giant Squid. It was hard to take a picture of the squid in formaldehyde, so instead here is Ben with the jaws of a Megal0don (giant shark).
girl's dress: craft night success

Emily and I had our first craft night last week, which turned into a complete success. We got out a bunch of fabric that we have been meaning to use (plus some scraps) and talked about different projects we wanted to accomplish. We both had visions for some upcoming projects (I'm working on a duvet), but we needed more fabric.
So we decided to start off with a small project: making a girl's dress. We both have nieces, so we grabbed some extra fabric we had around the house and got started. The style we used is quite easy - simple a-line dress with pleats at the neck. The original picture we saw included sleeves, but we instead decided to just do a summer dress edged around the arms and neck. We also opted out of putting in a button in the back, and instead we had the edging open at one side of the neck and tie in a bow to close (brilliant idea and much easier than a button).
Emily and I were quite please with the results. We added the pockets as a finishing touch. We are planning on continuing to make more kids clothing (since they are short projects, don't take a lot of sewing skills, and really fun to create).

Here is a close up of the pleats in the front around the neck and the bow that closes the dress.
Subscribe to:
Posts (Atom)


