I have been enjoying riding public transportation to work for almost 10 years. When I worked summer jobs at the Mayo Clinic, I always took the city bus to work and often the shuttle between the downtown campus and St. Marys. In college I never owned a car, so I rode the Provo bus to the grocery store and to run errands. In DC I took the metro to work, first when I worked in the downtown area and then in Chevy Chase. I have learned to really enjoy commuting in mass transit. I mean, where else can you take a nap, listen to an ipod, read a book, or people watch all while getting to work?
Riding the metro in DC was so delightful. DC has by far the cleanest subway system in the world (I've ridden the subway in Paris, London, Barcelona, New York, and Boston.) The trains are spacious and air conditioned. The stations tell you when the next train will arrive. It is easy to transfer from one side of the tracks to another. And except for the tourists, people who commute on the metro DO NOT TALK. This is pretty much a hard and fast rule; people like to have it quiet on the trains and I've even seen people ask others with loud headphones to turn it down.
Riding the metro (called the T) in Boston has been a whole different experience. The train lines were built at different periods, so some are nice and modern, while others are extremely old. The biggest difference is the attitude of the riders here in Boston. I'm not sure if it is a factor of the culture (Bostonians are often pretty rude) or what, but each day I learn new things. For example:
1. People like to stand up as the train is moving to get 2 feet closer to the door. Mind you, the trains are pretty bumpy and like to jerk a lot, so this ends up making other loose their footing and hit other people. Apparently waiting for 30 seconds until the train stops has never occur ed to a lot of people.
2. If you bump someone, you might get into a fight. I have already witnessed a few heated words passed between passengers, all for things like bumping them while riding or taking a photo and the flash getting in their eyes. In DC even if someone pokes your eye with their finger or steps on your toes, you don't yell at them (both of these things have happened to me and other friends in DC).
3. Yelling "I love everyone" stops fighting. Actually this is the best way I have seen a fight defused. Unabashed love for everyone kind of makes people stop yelling.
4. It is perfectly okay to crowd near the doors, making it impossible for people to get off the train or for others to get on. I think Bostonians need more training on moving to the center of the car.
5. Don't think anything of a complete stranger yelling across the car to get the attention of another passenger. One day this older woman yelled across the train to talk to another man, who she wanted to know where he grew up and then started to give unsolicited recommendations on what to see in Boston. When the other passenger tried to ignore her, she then got really defensive.
6. Eating is allowed on the T, which might explain all the rats and mice I see. Gross.
All of this makes for a pretty entertaining commute. My only regret is that I don't carry a camera with me to take photos of all the craziness I see each day.
Wednesday, July 29, 2009

Wednesday, July 22, 2009
kid aprons
 My cousin Tiana visited Boston last week, and while she was here she decided to sew some aprons for her kids, since they are always wanting to help in the kitchen. I pulled out some random fabric I had left over from previous projects, and Tiana threw together some of the cutest aprons I have ever seen. Her son got to use some of my coveted John Deer fabric (what kid doesn't love tractors?). I'm so glad that he already realized that hammers belong in the pockets!
 Thanks Tiana for a great time touring Boston, eating cannoli, enjoying some of the best pizza Boston has to offer, and most importantly, getting to spend more time with you.
Tuesday, July 14, 2009
the sun dress
 I finally have pictures of the adorable sun dress that I made for Ben's little niece. This was one of the first sun dresses that I attempted, while on my sun dress sewing kick a few months ago. Isn't she adorable?
I made probably over 12 different dresses, and I really need to post pictures of them. If only I wasn't a sugar momma and had more free time on my hands.....
tortillas

Last night I finally decided to tackle a food that I have long wanted to make from scratch, but usually found a reason to just buy it at the store: tortillas. Since we were out of tortillas and I really wanted to eat enchiladas for dinner, I finally bit the bullet. I looked up a few recipes online to get a feel for the recipe. I was surprised at how easy they were to make (the dough took a matter of minutes to mix together) and how easy they were to roll out. I was expecting the dough to be really sticky and want to stick to the counter, but it was really easy to handle. I've still got some work making the tortillas round, but I will consider this a great success.
Tortillas
3 c flour
1 t salt
2 t baking powder
4 T butter (or shortening)
1 c warm water
Mix the flour, salt, and baking powder in a bowl. Cut in the butter with a fork or pastry cutter. Pour in half of the warm water and mix with a fork, then pour in a small amount at a time (1/4 c, then the other 1/4 c), stirring as you go. You want to add just enough water for the dough to stick and be really soft, but not too much. Feel free to add another few tablespoons of water if you need.
Once the dough is sticking together, kneed on a slightly floured surface for just a few minutes until dough is uniform (I did this for only 2-3 minutes, if that). Let the dough rest for 10 minutes, then divide into 10-12 parts. Roll out each bit of dough on a floured surface with a rolling pin and then cook on a medium-hot frying pan (no oil or butter). Shells cook around 2-3 minutes per side until golden brown with a few spots.

A special thank you goes out to my mother for the wonderful tortilla warmer she gave me that kept these tortillas perfectly warm and moist while I rolled out and cooked each one. I just heated up a stone in the microwave for 1 minute, placed it in the container, and then put each tortilla in when it was done cooking. 20 minutes later when we were ready to eat, the tortillas were still perfect.
For you readers out there (which is approximately 3 people) who are skeptical that you can actually make homemade tortillas WHILE making dinner, it was easy. I started the dough while the chicken was cooking in the pan. Then while the dough was resting for a few minutes, I finished the chicken, grated the cheese, and set the table. Then I rolled out one tortilla and while it was cooking, I rolled out the second, all while occasionally cooking the veggies.
Tuesday, June 30, 2009
lava cake
Kalli, one of my new friends in Boston, introduced Ben and I to lava cakes over the weekend, and I was instantly in love. I've had similar ones, but they involved putting truffles in the middle of each cake. This recipe makes more a fudgy cake batter, which when cooked has a nice and firm crust and then a gooey inside. Chocolate lovers beware!

Lave Cake
4 squares bakers semi-sweet baking chocolate
½ c butter
1 c powdered sugar
2 eggs + 2 egg yolks
6 flour
Preheat oven to 425 degrees, butter 4 custard cups (or 6-8 ramekins), place on baking sheet. Microwave butter and chocolate on high for 1 minute or until butter is melted. Whisk until chocolate is completely melted into butter. Stir in sugar and whisk eggs and egg yolks, then stir in flour. Divide batter between cups. Bake 13-15 minutes until sides are firm but centers are soft. Let stand 1 minute then run a small knife around edges to loosen then turn over onto dessert dishes. Serve with ice cream, whipped cream or fruit.
Lave Cake
4 squares bakers semi-sweet baking chocolate
½ c butter
1 c powdered sugar
2 eggs + 2 egg yolks
6 flour
Preheat oven to 425 degrees, butter 4 custard cups (or 6-8 ramekins), place on baking sheet. Microwave butter and chocolate on high for 1 minute or until butter is melted. Whisk until chocolate is completely melted into butter. Stir in sugar and whisk eggs and egg yolks, then stir in flour. Divide batter between cups. Bake 13-15 minutes until sides are firm but centers are soft. Let stand 1 minute then run a small knife around edges to loosen then turn over onto dessert dishes. Serve with ice cream, whipped cream or fruit.
Saturday, June 27, 2009
sense of accomplishment
I often talk with my best friend Jocelyn about how the small things in life really give us a sense of accomplishment. Like doing the laundry or staining the desk. Nothing feels better than working with your hands to get something done and then seeing the fruits of your labors. Even though I used to ask my mother "do I look I was built for manual labor" whenever she asked me to mow the lawn when I was a teenager, I now really appreciate the value of physical labor and the sense of accomplishment it brings.
I admit it; I love doing the laundry, doing the dishes, and cleaning the bathroom because after a few minutes you can see a real result. This morning I cleaned the bathroom and kitchen, organized our small apartment, vacuumed, sharpened the knives, filed some important documents, baked bread, and started the laundry. It is also easier to love doing these chores when you live in a small apartment which literally takes 20 minutes to clean and you are only doing the laundry for two people. I know that it will get more time intensive when our family gets bigger, but I am truly grateful for my ability to keep our home clean and organized.
I know that it is in fashion to have a maid or someone to do your housework, but I don't want to ever stop caring for my home or taking care of my belongings. I love how good it feels to do something myself and see a positive result from work.
I admit it; I love doing the laundry, doing the dishes, and cleaning the bathroom because after a few minutes you can see a real result. This morning I cleaned the bathroom and kitchen, organized our small apartment, vacuumed, sharpened the knives, filed some important documents, baked bread, and started the laundry. It is also easier to love doing these chores when you live in a small apartment which literally takes 20 minutes to clean and you are only doing the laundry for two people. I know that it will get more time intensive when our family gets bigger, but I am truly grateful for my ability to keep our home clean and organized.
I know that it is in fashion to have a maid or someone to do your housework, but I don't want to ever stop caring for my home or taking care of my belongings. I love how good it feels to do something myself and see a positive result from work.
Monday, June 22, 2009
iso new hair stylist
With all the pains of moving, one of the things that I have felt the hardest (besides being so far from all my dear, dear friends) is realizing that I need to find a new hair stylist. And by find I mean find someone willing to learn how to highlight hair so that I can get free highlights. And someone to cut my hair.
I just can't bring myself to pay money for a haircut or highlights. A) I can't afford it. B) It is overpriced. And C) I hate paying for something that I can do myself. Highlighting and cutting hair isn't that hard. I have taught probably 15 people how to highlight hair. Now I just need to determine which of my new Boston friends has the inclination to highlight my hair and get free highlights in return.
Any takers?
I just can't bring myself to pay money for a haircut or highlights. A) I can't afford it. B) It is overpriced. And C) I hate paying for something that I can do myself. Highlighting and cutting hair isn't that hard. I have taught probably 15 people how to highlight hair. Now I just need to determine which of my new Boston friends has the inclination to highlight my hair and get free highlights in return.
Any takers?
Saturday, June 20, 2009
my trophy wife days are over
Starting Monday my carefree days of pretending to be a trophy wife are officially over. My new job will entertain me instead of hulu, sewing, and a few new Boston friends during the day. Although I am incredibly thankful for a fantastic job in this economy, I will dearly miss the life of freedom that I have enjoyed these last few weeks. Here is a little of what I have done:
1. designed and sewed an adorable jacket: while out shopping with some new friends, we saw an adorable jacket at anthropology that we couldn't afford, but I was confident I could reproduce.
2. started weight lifting: even though I have never done this before, I have actually really enjoyed it so far. plus Ben is a great trainer.
3. explored Boston, the North End, and the Back Bay. nuff said.
4. took naps when I wanted, read lots of books, and caught up on some TV shows.
5. explored Cambridge, found the nearest public library, discovered a great discount fabric store, and tried to learn how to drive without getting lost. so far so good.
I will really miss my long days, but I am really looking forward to working in a great location in Boston with one of the best views. I guess working for the man has some advantages.
1. designed and sewed an adorable jacket: while out shopping with some new friends, we saw an adorable jacket at anthropology that we couldn't afford, but I was confident I could reproduce.
2. started weight lifting: even though I have never done this before, I have actually really enjoyed it so far. plus Ben is a great trainer.
3. explored Boston, the North End, and the Back Bay. nuff said.
4. took naps when I wanted, read lots of books, and caught up on some TV shows.
5. explored Cambridge, found the nearest public library, discovered a great discount fabric store, and tried to learn how to drive without getting lost. so far so good.
I will really miss my long days, but I am really looking forward to working in a great location in Boston with one of the best views. I guess working for the man has some advantages.
Tuesday, June 02, 2009
we moved
Since my husband is blessed enough to get into two Ivy League colleges in his life, we finally made the move to Boston last month. After quitting our jobs in DC, spending two fabulous weeks playing in Bulgaria and Rome, and then packing all our stuff, we made it to Boston. I promise to post more on our amazing vacation in Bulgaria, but for now I will share some highlights of our new city and home.
After apartment hunting for days, we finally decided to live close to campus, and we are thrilled about our new apartment. It is beautiful, convenient, and I love being in Cambridge. We moved in last Saturday and spent the first few days literally just unpacking boxes and trying to get everything to fit. I am happy to say that everything did fit and our new apartment looks great. We still have a few pictures to hang, but it is really coming together. Ben even let me hang up the disco ball because, and I quote, "I love you, and you love the disco ball." I figure if I am cooking all the meals for two years, then I at least get to have a kitchen that makes me happy. And boy does this kitchen make me happy. For the first time we have a dishwasher and we really lucked out on the granite counter top!!!
After we finally unpacked everything, we decided to explore Boston on Saturday since the weather was perfect. We took the T into Boston and walked along the Freedom Trail to see most of the historic sites. We stopped by Fanueil Hall for lunch at Wagamamas and then walked to the North End for amazing Italian pastries. On our way back we found an open air market and bought a week's worth of veggies for $5. The prices were incredible!
Ben is off enjoying school, so for the meantime I am pretending that I am a trophy wife (when in reality I am looking for jobs, not spending money and definitely not lounging by any pool). I do love my new neighborhood, especially being so close the the river. Boston is a beautiful city and reminds me a lot of DC.
Tuesday, April 14, 2009
amazing chocolate chip cookies
I need to thank my friend SueZann for making her amazing chocolate chip cookies at a dinner on Sunday. They were some of the best chocolate chip cookies I have had, which is saying something because I usually don't like most that I try.
Chocolate Chip Cookies
2 eggs
2/3 c shortening
2/3 c butter
1 c sugar
1 c brown sugar
2 t vanilla
1 t baking soda
1 t salt
3 1/2 c flour
1 c chocolate chips
1 c butterscotch chips
Preheat oven to 375° F.
Combine flour, baking soda and salt in small bowl. Beat eggs and add butter, granulated sugar, brown sugar, shortening and vanilla extract in large mixer bowl until creamy. Gradually beat in flour mixture. Stir in morsels. Drop by rounded tablespoon onto ungreased baking sheets.
Bake for 9 to 11 minutes or until golden brown. Cool on baking sheets for 2 minutes; remove to wire racks to cool completely.
Chocolate Chip Cookies
2 eggs
2/3 c shortening
2/3 c butter
1 c sugar
1 c brown sugar
2 t vanilla
1 t baking soda
1 t salt
3 1/2 c flour
1 c chocolate chips
1 c butterscotch chips
Preheat oven to 375° F.
Combine flour, baking soda and salt in small bowl. Beat eggs and add butter, granulated sugar, brown sugar, shortening and vanilla extract in large mixer bowl until creamy. Gradually beat in flour mixture. Stir in morsels. Drop by rounded tablespoon onto ungreased baking sheets.
Bake for 9 to 11 minutes or until golden brown. Cool on baking sheets for 2 minutes; remove to wire racks to cool completely.
Monday, March 23, 2009
tropical lime torte with mango compote
My mother made this dessert at my wedding luncheon and everyone was blown away. We were serving cheese cakes and a chocolate cake later that day at the wedding reception, so my mom decided to pick something different for the luncheon. This dessert was so incredibly fabulous that I think I wanted to lick my plate clean. Please note that this recipe does take some preparation (refrigeration over night), but it is well worth the effort.
Torte
4 large eggs
3/4 cup plus 2 tablespoons sugar
1/2 cup fresh lime juice
1 tablespoon grated lime peel
1/2 cup dark rum
1 16-ounce frozen all-butter pound cake, thawed
2 8-ounce packages cream cheese, room temperature
Compote
1/2 cup water
1/2 cup sugar
1/2 cup fresh lime juice
1/2 teaspoon grated lime peel
4 large ripe mangoes (5 to 6 pounds), peeled, pitted, diced
lime slices
For Torte: Whisk eggs, 3/4 cup sugar, lime juice and lime peel in heavy medium saucepan to blend. Whisk over medium-high heat until mixture thickens and just comes to boil, about 6 minutes. Transfer lime curd to small bowl; press plastic wrap directly onto surface. Chill until very cold, at least 3 hours and up to 3 days.
Line 9 1/4x51/4x23/4-inch loaf pan with 2 layers of plastic wrap, leaving long overhang. Stir rum and remaining 2 tablespoons sugar in small bowl until sugar dissolves. Trim brown layer from outside of cake. Cut cake horizontally into 3 equal layers. Beat cream cheese in large bowl until fluffy; gently fold in cold lime curd.
Trim bottom cake layer to fit pan bottom; reserve cake trimmings. Brush layer on both sides with 1/3 of rum syrup. Place in pan; spread 1 1/2 cups lime curd mixture over top. Brush second cake layer on both sides with 1/3 of rum syrup. Place in pan; spread remaining lime curd mixture over top. Brush third cake layer on both sides with remaining rum syrup. Place on lime curd mixture; press to adhere. Press reserved cake trimmings around sides. Cover torte with plastic overhang. Refrigerate torte at least 1 and up to 2 days.
For Compote: Stir first 4 ingredients in large bowl until sugar dissolves. Mix in mangoes.
Cover; chill up to 1 day.
Using plastic as aid, lift torte out of pan and unwrap. Cut crosswise into 12 slices. Arrange slices on plates. Top with compote. Garnish with lime slices.
Torte
4 large eggs
3/4 cup plus 2 tablespoons sugar
1/2 cup fresh lime juice
1 tablespoon grated lime peel
1/2 cup dark rum
1 16-ounce frozen all-butter pound cake, thawed
2 8-ounce packages cream cheese, room temperature
Compote
1/2 cup water
1/2 cup sugar
1/2 cup fresh lime juice
1/2 teaspoon grated lime peel
4 large ripe mangoes (5 to 6 pounds), peeled, pitted, diced
lime slices
For Torte: Whisk eggs, 3/4 cup sugar, lime juice and lime peel in heavy medium saucepan to blend. Whisk over medium-high heat until mixture thickens and just comes to boil, about 6 minutes. Transfer lime curd to small bowl; press plastic wrap directly onto surface. Chill until very cold, at least 3 hours and up to 3 days.
Line 9 1/4x51/4x23/4-inch loaf pan with 2 layers of plastic wrap, leaving long overhang. Stir rum and remaining 2 tablespoons sugar in small bowl until sugar dissolves. Trim brown layer from outside of cake. Cut cake horizontally into 3 equal layers. Beat cream cheese in large bowl until fluffy; gently fold in cold lime curd.
Trim bottom cake layer to fit pan bottom; reserve cake trimmings. Brush layer on both sides with 1/3 of rum syrup. Place in pan; spread 1 1/2 cups lime curd mixture over top. Brush second cake layer on both sides with 1/3 of rum syrup. Place in pan; spread remaining lime curd mixture over top. Brush third cake layer on both sides with remaining rum syrup. Place on lime curd mixture; press to adhere. Press reserved cake trimmings around sides. Cover torte with plastic overhang. Refrigerate torte at least 1 and up to 2 days.
For Compote: Stir first 4 ingredients in large bowl until sugar dissolves. Mix in mangoes.
Cover; chill up to 1 day.
Using plastic as aid, lift torte out of pan and unwrap. Cut crosswise into 12 slices. Arrange slices on plates. Top with compote. Garnish with lime slices.
Wednesday, March 18, 2009
streusel kuchen
Last night I taught our monthly cooking class for Enrichment, and I decided to teach on making bread, since it is so easy to make, but yet a lot of people have never tried it. We made two batches of french bread and then two pans of Streusel Kuchen (German Crumb Cake). The recipe came from my great grandmother, and it is absolutely fantastic. You literally combine the ingredients and press it into a pan and bake.
The french bread was a huge hit! I also brought along my dipping spices, which always make bread better. After that, we talked while the Streusel Kuchen baked in the oven, and then I passed around pieces of the cake for everyone to try. We had about 30 women at the cooking class, so it was a great success.
Streusel Kuchen
3 T yeast
½ c warm water
1 c scalded milk
½ c butter
½ t lemon extract
2 eggs
½ c sugar
4-5 c flour1 t salt
Combine yeast and water and let grow. Melt butter in scalded milk. Add to yeast mixture along with the eggs, sugar, and extract. Add flour until dough is soft and still a little sticky. Press into pan and rise for 20-30 minutes. Combine sugar, flour, butter and sprinkle on top. Bake at 350 for 12-15 minutes. Glaze with ¼ c lemon juice and 2-3 c powdered sugar. Best if served warm.
Crumbles:
1 c flour
1 c sugar
½ c butter
Glaze:
¼ lemon juice
2-3 c powdered sugar
The french bread was a huge hit! I also brought along my dipping spices, which always make bread better. After that, we talked while the Streusel Kuchen baked in the oven, and then I passed around pieces of the cake for everyone to try. We had about 30 women at the cooking class, so it was a great success.
Streusel Kuchen
3 T yeast
½ c warm water
1 c scalded milk
½ c butter
½ t lemon extract
2 eggs
½ c sugar
4-5 c flour1 t salt
Combine yeast and water and let grow. Melt butter in scalded milk. Add to yeast mixture along with the eggs, sugar, and extract. Add flour until dough is soft and still a little sticky. Press into pan and rise for 20-30 minutes. Combine sugar, flour, butter and sprinkle on top. Bake at 350 for 12-15 minutes. Glaze with ¼ c lemon juice and 2-3 c powdered sugar. Best if served warm.
Crumbles:
1 c flour
1 c sugar
½ c butter
Glaze:
¼ lemon juice
2-3 c powdered sugar
Tuesday, March 10, 2009
spring apron giveaway winner
Congratulations to Jill for being the lucky winner of the Spring Apron Giveaway! Jill will receive one custom made apron by your truly.
Jill, please email me at artnotascience@gmail.com the address you would like me to mail it to.
Jill, please email me at artnotascience@gmail.com the address you would like me to mail it to.
Wednesday, March 04, 2009
the BEST cupcakes in DC

As a baker myself, I'm usually skeptical of reports of great cakes or cupcakes. Often I have a slice of cake and think "my own carrot cake is better than this." If you are a food snob like myself (or love cupcakes), then you MUST try out Frosting, A Cupcakery.
My friend Michelle is one of the most talented bakers I have ever met and just opened her own cupcakery. Last weekend I had the pleasure of tasting her amazing cupcakes, and I was honestly blown away by the presentation and taste. The cupcakes were impeccably frosted and so delicious that I may or may not have eaten a few in one sitting. My favorite flavors were the Cookie MOMster (chocolate cupcake with almond and Oreo butter cream frosting) and Babas Baby (carrot cake with cream cheese frosting). The menu is HUGE and is full of so many delicious options.

My friend Emily also came over to taste test the cupcakes, and we both agreed these were by far the best cupcakes in DC. The shop is still not open yet, but you can order cupcakes to be delivered. If you love cupcakes, you must try these.
Tuesday, March 03, 2009
the best chocolate frosting i've ever had
I am not exaggerating that this is the best chocolate frosting that I have ever had. Thanks to Jenn Fox for introducing me to this frosting and providing her recipe. She even told me that it has been used to woo men. I'm so not surprised.
Chocolate Buttercream Frosting
3 ounces unsweetened chocolate, melted
2 ½ cups powdered sugar
1 ½ tablespoons unsweetened Dutch-process cocoa powder
1 ½ cups or 3 sticks unsalted butter, at room temperature
1 teaspoon vanilla extract
½ cup heavy whipping cream, at room temperature
Sift the powdered sugar and cocoa powder into a large bowl. Add the butter and using an electric mixer on low speed beat until smoothly blended, about 2 minutes. Add the unsweetened melted chocolate, vanilla and heavy cream, mixing to incorporate. On medium speed, beat the frosting for at least 3 minutes, until it looks smooth and creamy and the color lightens. Once the cupcakes are frosted they can be left for up to three days at room temperature or stored in the refrigerator. Makes enough frosting for one box cake or cupcakes.
Monday, March 02, 2009
arts and crafts part 2
Just thought I'd post pictures of the continuation of arts and crafts day. After lunch with my husband, I went back to sewing another dress and then an apron. It has been a really fun day using up old scraps of fabric and seeing what kind of fun things I can make. It may be snowing outside, but it definitely feels like spring.
 The fabric is white with green concentric circles. I loved the contrast of the orange fabric for the pocket.
 Here is a close-up of the orange bow that ties the two sides of the dress together. You can see the pattern of the green fabric here.
 I've had this fantastic blue fabric with tiny white bows for awhile, so I finally decided to use the last bit to make an apron.
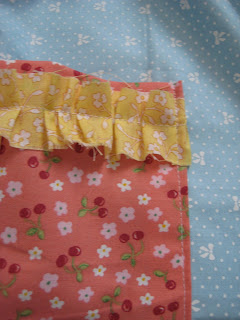 Here is a close-up of the cherry fabric and the blue bow fabric. Both were scraps from other projects, so I was happy to use them up.
 The fabric is white with green concentric circles. I loved the contrast of the orange fabric for the pocket.
 Here is a close-up of the orange bow that ties the two sides of the dress together. You can see the pattern of the green fabric here.
 I've had this fantastic blue fabric with tiny white bows for awhile, so I finally decided to use the last bit to make an apron.
 Here is a close-up of the cherry fabric and the blue bow fabric. Both were scraps from other projects, so I was happy to use them up.
snow day: arts and crafts
 I woke up this morning at 5:45 am to the sound of my cell phone ringing. I would have been more mad, but it was just work calling saying that the office was opening two hours late. I peeped through the blinds to see a few inches of snow, jumped back in bed, and dreamed of a snow day (I'm not joking, I really did dream I had a snow day).
Ben and I woke up at the normal time and enjoyed a very leisurely morning. As I was getting ready to bundle up and head out into the snow, I got another call from work saying they have decided to close the whole day! I may or may not have done a little dance and giggled. Ben put on his snow boots and headed out the door to walk to work in this year's first winter wonderland. He also snapped the picture of us "snowed in."
After updating the blog on this weekend's activities, I pulled out the sewing machine and surger to work on some projects. And 60 minutes later I would like to share my newest creation!

Behold, the girliest dress I have ever made. Not that I don't like it (I LOVE those ruffles).

A close up of the ruffles. I added them at the end kind of as an experiment. And I love them. I don't think every girl needs to wear ruffles all the time, but it sure does make this dress fun.
 A close up of the pocket with a ruffle. (Blogger sometimes likes to rotate my pictures without my telling it to. I'm not sure how to undo this, so here is a sideways pocket.)
american history museum
Ben and I love taking advantage of the free and incredible museums in DC, so this past Saturday we headed to the newly opened American History Museum (which was closed for a few years for renovations). A lot of the exhibits were the same as before (First Ladies Dresses, The Flag), but others were new.
I loved exhibit on transportation. It had really old buggies, a Ford Model T (in black, the only color it came in because black paint dried the fastest), a Roadster, and lots of other vintage cars. It was really amazing to see the changes in style over the years and also see old models that you only see in movies.
There was also a fabulous exhibit on America in war. It had great artifacts (Washington's dishes from when he was in battle) and really great displays. It reminded me a lot of the Holocaust Museum (it was also incredibly instructive), but not nearly as depressing.
The other fun part about this museum, is that it had random artifacts from American history and Pop Culture. Here is Ben with some of his favorites:

 Oscar the Grouch (who was originally created orange instead of green)
 C3PO. I have to admit this was pretty awesome.
 Ben and I also popped into the Natural History Museum to see an exhibit with a real Giant Squid. It was hard to take a picture of the squid in formaldehyde, so instead here is Ben with the jaws of a Megal0don (giant shark).
I loved exhibit on transportation. It had really old buggies, a Ford Model T (in black, the only color it came in because black paint dried the fastest), a Roadster, and lots of other vintage cars. It was really amazing to see the changes in style over the years and also see old models that you only see in movies.
There was also a fabulous exhibit on America in war. It had great artifacts (Washington's dishes from when he was in battle) and really great displays. It reminded me a lot of the Holocaust Museum (it was also incredibly instructive), but not nearly as depressing.
The other fun part about this museum, is that it had random artifacts from American history and Pop Culture. Here is Ben with some of his favorites:
Remnants from the original Star Spangled Banner
 Oscar the Grouch (who was originally created orange instead of green)C3PO. I have to admit this was pretty awesome. Ben and I also popped into the Natural History Museum to see an exhibit with a real Giant Squid. It was hard to take a picture of the squid in formaldehyde, so instead here is Ben with the jaws of a Megal0don (giant shark).
girl's dress: craft night success

Emily and I had our first craft night last week, which turned into a complete success. We got out a bunch of fabric that we have been meaning to use (plus some scraps) and talked about different projects we wanted to accomplish. We both had visions for some upcoming projects (I'm working on a duvet), but we needed more fabric.
So we decided to start off with a small project: making a girl's dress. We both have nieces, so we grabbed some extra fabric we had around the house and got started. The style we used is quite easy - simple a-line dress with pleats at the neck. The original picture we saw included sleeves, but we instead decided to just do a summer dress edged around the arms and neck. We also opted out of putting in a button in the back, and instead we had the edging open at one side of the neck and tie in a bow to close (brilliant idea and much easier than a button).
Emily and I were quite please with the results. We added the pockets as a finishing touch. We are planning on continuing to make more kids clothing (since they are short projects, don't take a lot of sewing skills, and really fun to create).

Here is a close up of the pleats in the front around the neck and the bow that closes the dress.
Wednesday, February 25, 2009
spring apron give away
Since every girl needs an adorable apron and spring is just around the corner, I will be giving away one of my custom made aprons to one of my lucky readers. If you would like to qualify to be entered into the drawing, please do the following:
1. Leave a comment on this post by March 9th stating how lovely my blog is and what your favorite entry has been so far. Also include your blog address.
2. Link your blog to my blog (I will also add you to my blog roll as well).
3. Feel free to add any suggestions of what you would like to see more of.
Once I have picked the lucky winner, I will email them to get a mailing address to send the apron to. Good luck to all (which I would say is pretty good since I think I have a total readership of about 8).
1. Leave a comment on this post by March 9th stating how lovely my blog is and what your favorite entry has been so far. Also include your blog address.
2. Link your blog to my blog (I will also add you to my blog roll as well).
3. Feel free to add any suggestions of what you would like to see more of.
Once I have picked the lucky winner, I will email them to get a mailing address to send the apron to. Good luck to all (which I would say is pretty good since I think I have a total readership of about 8).
Subscribe to:
Posts (Atom)


